No More Pigeon Poop! How to Get Rid of Pigeons on Roof

Pigeons perched on the roof of a building in Sacramento, CA

If you’re reading this, chances are you’ve got an unwelcome flock of feathered friends taking up residence on your roof. Don’t worry, you’re not alone! Pigeons are notorious for turning cozy rooftops into their personal pigeon paradises, leaving behind a trail of droppings, noise, and potential damage. But fear not, because we are here to guide how to get rid of pigeons on roof through the process of evicting these pesky squatters and reclaiming your rooftop serenity. The Pigeon Problem: Why Are They Here? First things first, let’s understand why pigeons are so fond of our roofs. It’s simple, really. Your roof provides the perfect combination of shelter from the elements and easy access to food sources (your trash cans, perhaps?). It’s also a prime location for building nests and raising their families. Before you know it, a couple of pigeons can quickly turn into a full-blown pigeon infestation, leaving you with a noisy, messy problem. But don’t despair! With a little understanding of pigeon behavior and the right strategies, you can deter them from your roof and keep them away for good. Proven Methods: how to Get Rid of Pigeons from Your Roof Ready to send those pigeons packing? Let’s dive into the most effective methods for getting rid of pigeons on your roof. 1. Physical Barriers: Make Your Roof Uninviting One of the most effective ways to keep pigeons off your roof is to make it physically impossible for them to land. This means installing bird spikes, netting, or chimney caps. Bird spikes are a popular choice because they’re easy to install and create an uneven surface that pigeons find uncomfortable. Netting is another great option, especially if you have large areas to cover. And if your chimney is a popular pigeon hangout, a chimney cap will quickly put an end to their rooftop parties. 2. Visual Deterrents: Scare Them Away Pigeons are surprisingly skittish creatures, and a few well-placed visual deterrents can send them flying in the opposite direction. Reflective tape, scare balloons, fake owls, and hawk kites are all effective ways to spook pigeons and make them feel unwelcome. The trick is to move these deterrents around regularly so the pigeons don’t get used to them. 3. Sound Deterrents: Crank Up the Volume If visual deterrents aren’t doing the trick, it might be time to turn up the volume. Ultrasonic devices and sonic repellers emit sounds that are unpleasant to pigeons but usually inaudible to humans. While these devices can be effective, it’s important to choose one that’s specifically designed for pigeons, as other types of bird deterrents may not work. 4. Repellent Sprays: Make Your Roof Stinky (to Pigeons) Nobody likes a bad smell, not even pigeons. Repellent sprays, either natural or chemical, can make your roof smell unappealing to pigeons, causing them to seek out more fragrant accommodations. If you choose a chemical spray, be sure to follow the instructions carefully and take safety precautions. Natural options like peppermint oil or cayenne pepper can also be effective and are generally safer for the environment. 5. Remove Food Sources: Don’t Feed the Pigeons If you’re unknowingly providing pigeons with a free buffet, it’s no wonder they’ve decided to stick around. Secure your trash cans, clean up any food spills promptly, and avoid feeding birds in your yard. By eliminating their food sources, you’ll make your roof much less attractive to these feathered freeloaders. Prevention is Key to Pigeon Control Once you’ve successfully gotten rid of the pigeons on your roof, the last thing you want is for them to return. Here are some proactive measures you can take to prevent future pigeon problems: Seal entry points: Inspect your roof for any gaps, cracks, or openings where pigeons could squeeze in. Seal these entry points with caulk, mesh, or other suitable materials. Remove standing water: Pigeons need water to drink and bathe, so eliminating any sources of standing water on your roof will make it less appealing. Trim trees and shrubs: Overhanging branches can provide easy access to your roof for pigeons. Keep trees and shrubs trimmed back to discourage them from using your roof as a launching pad. Regular cleaning and maintenance: Keep your roof clean and free of debris, as pigeons are attracted to cluttered areas where they can find food and nesting materials. By taking these preventive measures, you can significantly reduce the chances of pigeons returning to your roof and turning it into their personal haven again. Remember, a little bit of prevention goes a long way in the battle against these persistent pests. When to Call a Professional for Pigeon Removal While the DIY methods we’ve discussed can be effective for many homeowners, there are situations where it’s best to call in the professionals. If you have a large or persistent pigeon infestation, or if you’re simply not comfortable tackling the problem yourself, a pest control expert can provide the expertise and resources needed to get rid of pigeons safely and effectively. Here are a few signs that you might need professional help: Large infestation: If you have a large number of pigeons on your roof, it may be difficult to get rid of them using DIY methods alone. Persistent problem: If pigeons keep returning to your roof despite your best efforts, it may be time to call in the experts. Health concerns: Pigeon droppings can carry diseases, so if you’re concerned about the health risks associated with pigeons, a professional can safely remove them and clean up their mess. Difficult access: If your roof is steep or difficult to access, it’s best to leave the pigeon removal to the professionals. When choosing a pest control company, be sure to do your research and choose a reputable company with experience in pigeon removal. Ask for references and check online reviews to ensure that you’re working with a company that will get the job done right. Remember, getting rid of pigeons on your roof can be a challenging task, but with the right strategies and a little bit of persistence, you

What is TPO Roofing? A Comprehensive Guide for Homeowners

A depiction of rooftop coating in Sacramento, CA

Let’s Dive Into The world of TPO Roofing. Ever Heard of It? TPO stands for Thermoplastic Olefin. Sounds fancy, right? But it’s actually a type of single-ply roofing membrane that’s been taking the roofing world by storm. It’s like the cool new kid on the block, offering a modern and energy-efficient alternative to traditional roofing materials. TPO roofing has gained massive popularity in recent years, especially for commercial buildings. But guess what? Homeowners are catching on too! Why? Because it offers a whole bunch of benefits that make it a smart choice for protecting your most valuable asset – your home. So, what makes TPO roofing so special? It’s a durable, flexible, and reflective material that can withstand all sorts of weather conditions. Think of it as a superhero cape for your roof, shielding it from harsh UV rays, heavy rain, and even those pesky hailstorms. And the best part? It’s incredibly energy-efficient, which means you could save a bundle on your cooling bills during those scorching summer months. Sounds pretty awesome, doesn’t it? Advantages of TPO Roofing: Why Choose TPO? Energy Efficiency: Picture this – a white, reflective surface on your roof bouncing back the sun’s rays like a champ. That’s TPO in action! This reflectivity means your home absorbs less heat, keeping it cooler and reducing the workload on your air conditioner. Translation: lower energy bills and a happier wallet. Durability & Longevity: TPO is tough as nails! It’s resistant to punctures, tears, UV damage, and even those nasty chemicals that can wreak havoc on other roofing materials. This means your TPO roof will stand the test of time, protecting your home for decades to come. Weather Resistance: Mother Nature can throw a lot at your roof – scorching heat, freezing cold, torrential downpours, and even the occasional hail storm. But TPO roofing is designed to handle it all. It’s like a weatherproof shield for your home, keeping you safe and dry no matter what the forecast brings. Environmental Benefits:  TPO roofing is a sustainable choice. It’s often made with recycled materials and can be recycled at the end of its lifespan. Plus, its energy efficiency helps reduce your carbon footprint. Now that’s a win-win for both your home and the planet. Easy Installation & Maintenance: Nobody wants a roofing project that drags on forever. TPO roofing is relatively quick and easy to install, minimizing disruption to your daily life. And once it’s up there, it requires minimal maintenance. Just a few routine checkups and cleaning, and your TPO roof will keep looking and performing its best for years to come. So, there you have it! TPO roofing isn’t just another roofing option; it’s a smart investment in your home’s comfort, energy efficiency, and long-term protection. TPO Roofing Installation Process: A Step-by-Step Guide Now, we are not suggesting you DIY this one – it’s best left to the professionals. But understanding the process can help you appreciate the craftsmanship that goes into a quality TPO roof. Step 1: Surface Preparation Think of this as laying the groundwork for a masterpiece. Before any TPO membrane is laid down, the existing roof surface needs to be squeaky clean, dry, and smooth. This ensures proper adhesion and prevents any nasty surprises down the road. Step 2: TPO Membrane Layering Now comes the star of the show – the TPO membrane itself! This is usually rolled out in large sheets and carefully positioned on the roof. Special techniques are used to ensure proper adhesion and to create strong, watertight seams between the sheets. Step 3: Sealing & Flashing Think of this as reinforcing the armor. Flashing is installed around roof penetrations like vents, pipes, and skylights to prevent leaks. Seams are then sealed with heat or chemicals, creating a continuous, waterproof barrier. Step 4: Drainage Considerations Just like a well-designed landscape, a TPO roof needs proper drainage. This means ensuring that water flows smoothly off the roof, preventing ponding that can damage the membrane over time. Step 5: Quality Control & Inspection The final touch! A thorough inspection ensures that everything has been installed correctly and meets industry standards. This is your assurance of a top-quality TPO roof that will protect your home for years to come. So, there you have it – a bird’s-eye view of the TPO roofing installation process. It’s a meticulous process that requires expertise and precision, but the end result is a durable, energy-efficient, and worry-free roof for your home. TPO Roofing Cost Factors: What Influences the Price? TPO roofing is an investment in your home, and like any investment, it’s important to understand the cost factors involved. Now, we can’t give you an exact figure without knowing the specifics of your roof, but I can break down the key elements that influence the overall price. Roof Size & Complexity: This one’s pretty straightforward. The bigger your roof, the more materials and labor will be required, which translates to a higher cost. If your roof has a complex design with lots of angles, dormers, or skylights, that can also add to the complexity and expense of the installation. TPO Membrane Thickness: TPO membranes come in different thicknesses, typically ranging from 45 to 80 mils (a mil is a thousandth of an inch). Thicker membranes generally offer greater durability and puncture resistance, but they also come with a higher price tag. Insulation Requirements: Insulation is a crucial component of any roofing system, and TPO is no exception. The type and amount of insulation you choose will affect the overall cost. Labor Costs & Contractor Fees: This can vary depending on where you live and the experience of the contractor you choose. It’s always wise to get multiple quotes from reputable TPO roofing contractors to compare prices and ensure you’re getting a fair deal. Warranties & Additional Features: Some manufacturers offer warranties on their TPO membranes, which can add to the cost but also provide peace of mind. Additionally, there are optional features like reflective coatings or cool roof granules that can enhance the energy efficiency of your

Here Come the Rains How To Prepare Your Roof for Winter

Winter is coming, and with it, the possibility of heavy rain and snow in Northern California. According to NOAA, Northern California could be wetter and warmer than average during the winter season of 2023-2024, due to the influence of a strong El Niño. This means that your roof may face some challenges and risks from the increased precipitation and temperature fluctuations. To avoid costly damage and repairs, it is important to prepare your roof for the winter rains in Northern California. Here are some tips and steps you can take to ensure your roof is ready for the wet and cold weather ahead. Inspect Your Roof for Damage and Leaks The first step to prepare your roof for the winter rains is to inspect it for any signs of damage or leaks. You can do this yourself or hire a professional roofing contractor to do it for you. Look for cracked, curled, or missing shingles, broken or loose flashing, rusted or clogged gutters, sagging or stained ceilings, mold or mildew growth, and any other issues that may compromise the integrity and performance of your roof. If you find any damage or leaks, you should repair them as soon as possible, before the rain and snow start to fall. You can contact us at NorCal Roofing Inc., for a free estimate and quality service. We have the experience and expertise to handle any roofing problem, big or small. Clean Your Gutters and Downspouts Another important step to prepare your roof for the winter rains is to clean your gutters and downspouts. Gutters and downspouts are essential for directing the water away from your roof and foundation, preventing water damage, flooding, and erosion. However, if they are clogged with leaves, twigs, dirt, and debris, they can overflow and cause leaks, rot, and ice dams on your roof. To prevent this, you should clean your gutters and downspouts at least twice a year, preferably in the fall and spring. You can use a ladder, gloves, a hose, and a scoop to remove the debris from your gutters and flush them with water. You can also install gutter guards or screens to reduce the amount of debris that accumulates in your gutters. Trim Your Trees and Branches Another way to prepare your roof for the winter rains is to trim your trees and branches that are near or overhanging your roof. Trees and branches can pose a threat to your roof, especially during storms, when they can break and fall on your roof, causing damage, punctures, and leaks. They can also scrape and wear away your shingles, reducing their lifespan and effectiveness. To prevent this, you should trim your trees and branches regularly, keeping them at least 10 feet away from your roof. You can do this yourself or hire a professional arborist to do it for you. You should also remove any dead or diseased trees and branches that may be more prone to falling. Check Your Attic and Ventilation The final step to prepare your roof for the winter rains is to check your attic and ventilation. Your attic and ventilation play a vital role in regulating the temperature and moisture levels in your roof, preventing condensation, mold, and ice dams. However, if your attic is poorly insulated or ventilated, it can cause heat loss, energy waste, and roof damage. To prevent this, you should check your attic and ventilation for any problems, such as gaps, cracks, holes, leaks, or blockages. You should also make sure your attic has enough insulation and ventilation to keep your roof warm and dry. You can use a ruler to measure the depth of your insulation and compare it to the recommended levels for your climate zone. You can also use a thermometer to measure the temperature difference between your attic and the outside air. Ideally, your attic should be no more than 10 degrees warmer than the outside air in the winter. If you need help with improving your attic insulation or ventilation, you can contact us at NorCal Roofing Inc., for a free consultation and quote. We can help you choose the best insulation and ventilation products for your roof and install them professionally and efficiently. Conclusion Preparing your roof for the winter rains in Northern California is not only a smart move, but also a necessary one. By following these tips and steps, you can protect your roof from the potential damage and hazards of the wet and cold weather, and enjoy a safe and comfortable winter season. If you have any questions or concerns about your roof, or if you need any roofing services, please don’t hesitate to contact us at NorCal Roofing Inc., We are a licensed, insured, and certified roofing company that has been serving Northern California for over 20 years. We offer a wide range of roofing services, including roof repair, replacement, installation, maintenance, inspection, and more.  Don’t let the winter rains catch you off guard. Contact us today and let us take care of your roof. We are here to serve you, rain or shine.

Prolonging the Lifespan of Your Roof

Your roof is one of the most important parts of your home. It protects you and your belongings from the elements, and it can also affect your home’s energy efficiency and curb appeal. That’s why you want to make sure your roof lasts as long as possible. The average lifespan of a roof depends on several factors, such as the type of roofing material, the quality of installation, the climate, and the level of maintenance. According to Consumer Reports, asphalt shingles can last 15 to 20 years, metal roofs can last 20 to 40 years, and wood shingles and shakes can last 20 to 30 years. However, you can extend the life of your roof by following some simple tips. Here are some ways to keep your roof in good shape and avoid costly repairs or replacements. Clean Your Roof Regularly Dirt, debris, moss, mold, and mildew can accumulate on your roof over time. These can damage your roofing materials, cause leaks, and create an unsightly appearance. To prevent these problems, you should clean your roof regularly using a broom, a leaf blower, or a low-pressure washer. You can also use a mild detergent or a moss remover to get rid of stains and growths. However, you should avoid using a power washer or a high-pressure spray, as these can loosen the granules from asphalt shingles and void their warranty. You should also avoid walking on your roof or using harsh chemicals that can damage your roof or harm the environment. If you are not comfortable or confident with cleaning your roof yourself, you can hire a professional roofer to do it for you. A professional roofer will have the right tools, techniques, and safety measures to clean your roof effectively and safely. Trim Nearby Trees Trees can provide shade and beauty to your home, but they can also pose a threat to your roof. Branches that hang over or touch your roof can scratch and wear down your roofing materials. Leaves and needles that fall on your roof can clog your gutters and cause water damage. And in a storm, falling limbs or trees can cause severe damage to your roof and home. To prevent these risks, you should trim any nearby trees that are too close to your roof. You should also remove any dead or diseased branches that could break off easily. You can do this yourself if you have the proper equipment and skills, or you can hire a professional arborist to do it for you. Check Your Ventilation and Insulation Your attic plays a vital role in the health of your roof. If your attic is poorly ventilated or insulated, it can cause condensation on the underside of your roof deck, which can lead to rot and mold. It can also cause ice dams in the winter, which are ridges of ice that form at the edge of your roof and prevent melting snow from draining properly. Ice dams can damage your shingles, gutters, flashing, and eaves. To avoid these issues, you should check your attic ventilation and insulation regularly. You should have enough vents in your soffits, ridge, or gables to allow air to circulate freely in your attic. You should also have enough insulation in your attic floor to prevent heat loss from your living space. You should also seal any gaps or cracks around pipes, wires, ducts, or vents that could allow air leakage. If you are not sure how to check or improve your attic ventilation and insulation, you can consult a professional roofer or an energy auditor. They can assess your attic’s condition and recommend the best solutions for your home. Repair Any Damage Promptly Even with regular maintenance, your roof may still suffer some damage over time due to weathering, aging, or accidents. If you notice any signs of damage on your roof, such as missing or curling shingles, cracked or loose flashing, sagging or leaking gutters, water stains on your ceiling or walls, or mold growth in your attic, you should not ignore them. These could indicate more serious problems that could compromise the integrity of your roof. Instead of waiting for the damage to worsen or spread, you should repair it as soon as possible. You can do some minor repairs yourself if you have the skills and tools needed, such as replacing a few shingles or patching a small leak. However, for major repairs or complex issues that require professional expertise and equipment, you should hire a qualified roofer to do the job. By repairing any damage promptly, you can prevent further deterioration of your roof and extend its lifespan. Hire a Professional Roofer One of the best ways to prolong the lifespan of your roof is to hire a professional roofer for any roofing work that you need. A professional roofer will have the experience, knowledge, and skills to install, maintain, and repair your roof properly and safely. They will also have the necessary licenses, insurance, and warranties to protect you and your home. Whether you need a new roof, a roof inspection, a roof cleaning, or a roof repair, you should always choose a reputable and reliable roofer. You can find one by asking for referrals from friends, family, neighbors, or online reviews. You can also check their credentials, portfolio, references, and ratings with the Better Business Bureau or other trusted sources. By hiring a professional roofer, you can ensure that your roof is in good hands and that it will last longer and perform better. Conclusion Your roof is a valuable asset that deserves your care and attention. By following these tips, you can prolong the lifespan of your roof and save money and hassle in the long run. Remember that your roof is not only a functional part of your home, but also an aesthetic one. A well-maintained roof can enhance the appearance and value of your home and make it more comfortable and enjoyable for you and your family.

Early Detection of Roofing Issues Saves Money and Property

Damaged roof of a house showing the early detection of roof repair in Stockton and Roseville, CA.

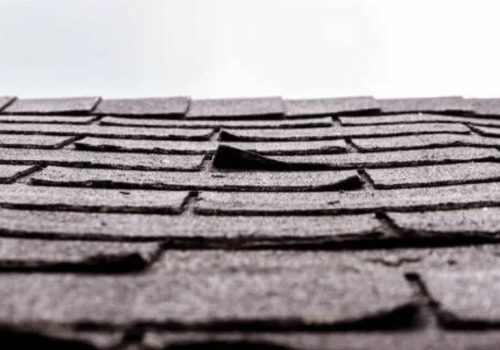
Early Detection is Key! The saying an ounce of prevention is worth a pound of cure is very applicable for your roof. Spotting roofing issues before they become big problems can be tough, especially if you’re not very familiar with your roofing systems. However, it is important to keep an eye out for any signs of damage or wear and tear to avoid costly repairs in the future. Some common roofing issues include old or torn shingles, worn-out flashing, clogged gutters, and more.  If you suspect that your roof has any of these problems, it is best to have a professional inspect it. A thorough inspection can help identify any potential issues and make necessary recommendations for repairs.  Check For Roof Leaks A leaking roof is one of the most common roofing problems that homeowners face. If you suddenly find a wet spot on your ceiling or a stain on it that keeps growing, you may have a small leak. If you have access to your attic, look inside at the area above the leak. Do you see wet insulation or stained areas on the sheathing or rafters? You may even want to have someone soak targeted areas of the roof with a hose while you examine below. Once you’ve found the leak, you’ll have to find the corresponding problem on the surface of the roof. Gutters Critical for Long Roof Life In addition to these common roofing issues, gutter problems can also cause significant damage to your home if left unaddressed. Poor gutter installation or maintenance can lead to gutters overflowing into the house causing mold or damage to your living space, damage to roofing components like tiles, shingles, soffits, and fascia. Falling leaves and twigs can quickly clog up gutters, eavestroughs, and downspouts, causing water to stagnate. This is why properly functioning downspouts and eavestroughs are essential and one of the most common roof maintenance issues homeowners face every year. It’s also why gutter guards are a good idea to help keep your gutters clear. Get Professional Help In conclusion, regular inspections and maintenance can help prevent costly repairs in the future. If you suspect that your roof has any issues, it is best to have a professional inspect it as soon as possible. Sometimes it is just as easy as replacing a few shingles or Tiles. Of course, don’t forget about your gutters! Proper installation and maintenance of gutters are crucial in preventing water damage and other related issues.

How to Know When It’s Time to Replace Your Roof

A large home featuring a spacious garage and a wide driveway in Sacramento, CA

Get Roof History If you’re wondering whether it’s time to replace your roof, there are a few signs you can look out for. The first step is to determine your roof’s history. You can do this by checking the installation date, which can be found in building permits or by contacting the installation company. Once you have this information, you can compare your roof’s age to the average material life expectancies. If your roof is reaching the end of its life expectancy, it may be time to replace it.  Check for Visible Damage Another sign that it’s time to replace your roof is by looking for visible wear and tear. If you notice any of the following warning signs, it’s important to act quickly: Visible wear and tear, sagging or drooping, Leaks & Water damage, Noticeable increase in energy bills, Cracked or peeling paint, Loose or damaged flashing as well as pest infestations. Also keep an eye on the Gutters and Soffits – they can show early signs of roof damage. Ask a Professional A typical roof can last anywhere from 15 to 25 years depending on the weather, type of roof and how well its been maintained. If you’re still unsure whether it’s time to replace your roof, consider hiring a professional to inspect it. Save Money – Consider Solar Also, if you are having to replace your roof, it may be a great time to consider installing Solar panels. Because of the provisions in the federal Inflation Reduction Act, there are some great tax advantages for installing solar. Plus you can get great financing (2.99%) for solar installation which can include the cost of roof replacement / upgrade. Make sure you ask your roofing professional about the advantages of installing solar when replacing your roof.   

Tips for Pressure Washing Soffits and Gutters!

A bird sitting on a pipe on the side of a building in Stockton and Roseville, CA

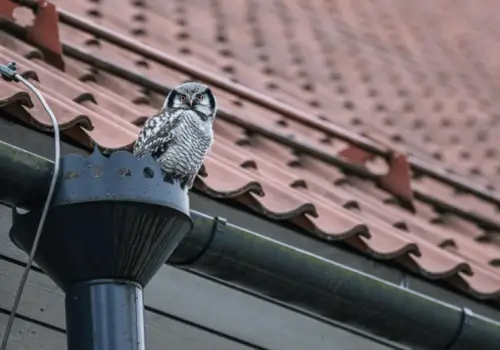
Tips for Pressure Washing Soffits and Gutters Keep Your Roof Looking Great! Maintaining Soffits and Gutters of your roof can add years to the life of your roof. Keeping Soffits clean maintains ventilation and prevents the attic from overheating in the summer or creating ice blocks in the winter. Keeping Gutters clean keeps them from getting clogged and prevents water accumulation in the attic area or damaging the siding from overflows.  Cleaning soffits and gutters can be a challenging task for homeowners. However, using a pressure washer can make it easy to keep these hard-to-reach areas looking great. In this article, we’ll cover which accessories can help and provide you with a few tips for safe and effective pressure washing to get your soffits and gutters looking like new in no time. 1. Before You Start Here are some of the tools that can be used to clean soffits and gutters with a pressure washer: • Pressure washer • Pressure washer gutter extensions (preferable to a ladder) • Safety goggles • Ear protection • Gloves • Scrubbing brush (optional) • Gutter trowel (optional) • Bucket 2. Soffits & Foliage When cleaning soffits and gutters with a pressure washer, it’s important to take precautions to avoid damaging the surrounding foliage. Start by soaking everything with clean water to rinse away any large debris or dirt from the soffits. This will also help prevent damage to the surrounding foliage. Use a low-pressure nozzle for your initial rinse to avoid damaging foliage or propelling dirt and debris into your soffits. While you’re at it, rinse the outsides of the gutters clean as well. 3. Applying Detergent When using a pressure washer to clean soffits and gutters, it’s important to use the right amount of detergent. Fill your detergent tank or pale with a detergent solution and make sure to dilute it according to the instructions on the detergent container if you’re using a concentrated detergent. Switch your detergent tank to “On,” make sure you have your detergent spray tip on, and begin applying the detergent to the soffits and the outsides of your gutters. To avoid propelling water into the soffits, don’t face your soffits directly. Instead, aim ahead of yourself and to the side a bit. You also don’t want to spray directly up at the soffits as this can cause mold or mildew growth. Minimize the amount of water you spray inside your soffits by aiming carefully. Once you’ve thoroughly covered your soffits and gutters with detergent, let it work its magic on the dirt and stains while you switch spray nozzles. 4. Wash away Dirt & Detergent Once your detergent has worked its magic on the stains, switch your nozzle to a high-pressure spray pattern. Turn off your detergent tank and aim the nozzle at a walkway. Squeeze the trigger to flush out any remaining detergent. Begin from the same spot you began when applying detergent and work in the same direction. Spray evenly along your soffits and gutters to remove all of the detergent, dirt, and stains. Some spots may be more stubborn than others, so take a little more time spraying those areas to ensure an even clean. Once you’re finished, switch back to a low-pressure nozzle and spray clean water over the surrounding foliage to rinse away any remaining detergent. 5. Cleaning the Gutters Cleaning the inside of your gutter can be dangerous if you climb a ladder. Instead, you can use a pressure washer gutter cleaner. These curved attachments allow you to hold your wand up and spray directly into the gutters while keeping your feet planted securely on the ground. You should avoid using a pressure washer from a ladder if at all possible. Start near a downspout and spray away from it. Angle your wand so the stream of water points away from the downspout, and progress down the length of the gutter. With enough pressure, the force of the water should propel debris out of the gutter. If your gutters have a lot of debris, you may want to clean some out by hand first to avoid clogging your downspouts. Try not to force too much debris into your downspouts. 6. Conclusion Depending on the roof, maintaining Soffits and Gutters can be a challenging undertaking and possible dangerous, especially if a ladder is needed to reach specific areas of the roof. In these types of situations getting professionals for the job can save you a lot of time and money – especially if things don’t work out as planned. A professional roofer can also identify other issues with the roof during this process.  A bonded and insured roofing company has all the tools and expertise to do this correctly.  NorCal Roofing Inc. is an organization that has been in business for over 30 years and works with all type of roofs & gutters.  If you are interested in getting a free quote for NorCal Roofing services Contact Us.